Poppy Parker Live from the Oscars Red Carpet!
Every time the Oscars roll around, I feel compelled to do some kind of red carpet or Oscar themed shoot. I have done Barbie getting dressed in her closet. I’ve done Barbie on her way to presenting the Oscar. I’ve done Barbie on the red carpet. I have yet to do any Integrity Toys, Inc products for the Oscar night festivities. Well…I’m going to fix that right now! Poppy Parker is going to the Oscars!

Model: Mood Changer Poppy Parker repainted and restyled by Jon Copeland-Childers of SeloJSpa ( she has been re-bodied on a FR2 body)
Gown: Pansak Charoentonphubal of Eifeldolldress
Jewelry: On Set ( gift fashion from 2015 I.T. Cinematic Convention)


Will try and have my red carpet picks and pans from the Oscars on Monday ![]()
The Art of the Vignette
Thank you so much for the response to my last post “The Fashion Doll Vignette”. I have been toying around with doing a regular segment on the blog for a while that is devoted specifically to the small sets or dioramas that I use in my photos or displays. In particular, I want to share some diorama items and furniture that I have obtained over my years of collecting. I look forward to sharing these “vignette” or “diorama” posts on a more regular basis in the future.
The word Vignette has multiple meanings. In photography, to vignette is a verb meaning to darken or lighten the corners and edges of a photo in a way to highlight a part of the photo. I use this technique on many of my photos. It helps to bring the focal point to a part in the picture that you want everyone’s eye to travel to…typically the center. Vignette used as a noun can also mean a small pleasing grouping or portrait. When I photograph things, many times I like to use a small diorama with it. Sometimes it is elaborate and sometimes it is just a small piece or two. For this set of photos, I used a number of pieces.
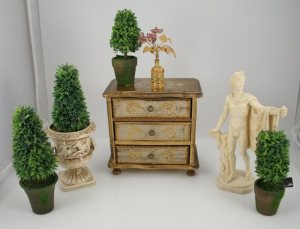
First and foremost, I used another Carolyn Grentz exquisitely painted OOAK bombe chest in 1/6 scale. Still in talks with her to see if she has room in her commission books for more.

The two side chairs were found on Ebay. I was able to get them marked down and even at that price, in retrospect, they were kind of pricey. If they came down to say, $65, they would be a better purchase I think. The floral arrangement was made by me and I used various artificial flowers that fit with the scale. Many of the flowers are scrapbooking elements of some kind or picks you can find in the boutonniere making section of your local craft store. The purse is slightly big for 1/6 scale but it works as say an over night bag or oversized bag for the playscale girls. It is a Kate Spade keychain/coin purse.

Model: Victoire Roux workshop doll from The Premiere Convention
Dress and coat: Bellissima Couture
Shoes: Mattel
Hat: Floral Scrapbook element
The coat of this beautiful ensemble is out of fabric that is a map of Paris. Too cute!!


Here are some more photos of that fabulous bombé chest.


The Doll Room Goes On Display: Part II
Yesterday I explained why things have been a little crazy at Inside The Fashion Doll Studio. I have been working well over a month and a half ( since Fashion Royalty convention really) to get our house ready for a charity holiday tour that included the doll room. The same weekend the tour happened, I was also contracted to photograph my daughter’s dance schools dress rehearsal of The Nutcracker. We also needed to attend her performances. I also hosted a ladies holiday tea for about 50 ladies and to top it off…it was my birthday in there somewhere. There was LOTS going on the weekend of December 6 – 8th.
I left off in part one of this post explaining my anxiety at opening up the doll room to the public for this holiday walk. I was anxious to see what people would think. I was fully prepared to answer a few questions and field comments like “Are you crazy?’. What I was not prepared for was to be fully occupied the three hours Deanna, Hilda and I proctored the doll room area with comments, questions and exclamations of joy and wonder. I called the evening “better living through Barbie”. I think the thing I heard the most as people came up the stairs to the doll room area was their surprised gasps of “ OH MY GOD!!” upon seeing some of the collection for the first time. It was an exclamation of an unexpected positive experience.


The collection was not what people were expecting and the look of amazement when they looked around warmed my heart. When I questioned people “ Not what you were expecting was it? You were expecting the Barbies you see at Target right?” They would reply every single time “ Yes!” with a wide-eyed expression. I received thank you upon thank you for sharing the collection. There were lines to get up to the doll room area. At some points during the day, there were lines just to get into the house let alone the doll area. The Assistance League of the Eastside had told people that there would be some Barbie experts on hand from the hours of 4-7pm to answer questions. People came back! They came back and brought their mothers, their daughters, their sisters and some even brought back their husbands. I think that was the biggest surprise of the evening for me. These husbands not only came into the doll area but they spent time looking AND ASKED QUESTIONS! I was completely amazed and overwhelmed at the outpouring of interest. I enjoyed hearing the rich tapestry of stories and Barbie memories that unfolded throughout the evening. Sisters recounted playtime memories with each other, Grandmothers and mothers remembered sewing or crocheting for Barbie and the granddaughters and daughters remembered learning how to sew through Barbie. Many remembered the first experiences of self expression through cutting their Barbie’s hair.


The fashion was another big topic of discussion. There were many conversations about particular designer influences and most everyone enjoyed the 1/6 scale purse tree in the actual doll room itself. I had a buyer for Federated Department Stores come up to me and say how much she loved how everything was displayed.
 The most common questions of the evening were:
1. How long have you been collecting? Since my daughter was 3 so a little over 10 years.
2. Why did you start collecting? My daughter received a collector Barbie when she was 3 and my first thought was “ Great! who gives a 3 yr old a collector Barbie? She is going to trash it!” But she didn’t so I thought maybe collector Barbies would be something we could do together…you know…something for Christmas and birthdays. I started to do some research on collector Barbies and started looking at Barbiecollector.com and was blown away by the collector doll offerings. I essentially went down the rabbit hole at that point….and have not come out yet.
3. How many dolls do you have? I currently have around 600 and that is most likely as big as it will get. I am maximized right now which means…if something comes in…something has to go out.
4. What is the most expensive doll? I never really answered that question…instead I would point to some of the rarer items that are in the collection. I have a BFMC display case that is a treasure in my collection and I managed to procure a City Smart Silkstone Barbie through a great doll friend a couple years ago. I also have a set of 1/6 Bespaq bedroom furniture that is very rare and I treasure that as well.


Some of the new displays for this year are as follows:
I adored the garden scene I shot so much that it became a permanent display in the doll room

I also picked up some amazing 1/6 scale furniture pieces in Paris this past year.

Elizabeth Taylor joined the work room display

and the nightclub scene

New Fashion Royalty convention additions


And a new treasure added for the walk. A stunning pink silk and French lace gown by Hilda of Bellissima Couture. She made me this for my birthday…and I just about cried when I saw it. Stunningly beautiful beyond words!! Love ya Hilda…Mwah!

The entire day of participating in this home tour and showing this collection was a completely amazing experience and the fact that it helped raise money to support local and very necessary programs made it that much more meaningful. In this season of giving, I am so very grateful to all the people who opened their hearts, minds and pocketbooks to support the Assistance League of the Eastside. I also want to thank those who came up to me and personally commented on the collection. As an avid collector, It was a complete joy to see the love of this doll expressed and for some rekindled.
Diorama Finds
I purchased a couple of things that I wanted to pass on to people. Halloween is just around the corner and I know many collectors are into that gothic look and feel. Someone on Doll Divas posted about a set of black gothic chairs a while back ( sorry I can’t find the original post) and I decided to check them out. I was a bit skeptical about the sizes but I gambled and won on this one. They are , in my opinion, the right scale for 1/6 fashion dolls.

You can find these beauties at the Victorian Trading Company. http://www.victoriantradingco.com/item/80-ha-8023219/100100104/gothic-arm-chairs-set-of-3
They cost $49.95 so that works to $16.65 per chair. I don’t feel that is exorbitant for three 1/6 scale chairs. They are made of resin so kind of heavy but not too bad. One of the kind of cool features is that they have a hanging hook on the back so you could put them on the wall. It’s kind of an interesting display idea don’t you think?! I may have to try that one. Also, it looks like these could be painted as well so there you go. A big “Thank You” to whoever posted this link on Doll Divas!
While I was perusing my recent Pottery Barn catalog I ran across something interesting. I am all about Christmas décor planning right now so I was looking at the new ornaments coming out. They had the most adorable bottle brush dogs as ornaments. I looked at the sizing and thought “Hey, I bet those could be really cute as diorama pets!”.

It’s an Airedale!! I Had to have it. http://www.potterybarn.com/products/bottlebrush-airdale-ornament-holiday-2013/?pkey=cornaments-trim-holiday&cm_src=ornaments-trim-holiday||NoFacet-_-NoFacet-_–_-

And a Cocker Spaniel .. http://www.potterybarn.com/products/bottlebrush-cocker-spaniel-ornament-holiday-2013/?pkey=cornaments-trim-holiday&cm_src=ornaments-trim-holiday||NoFacet-_-NoFacet-_–_-


They run from $8.50 to $10.50 a piece. I was really, really tempted to get the St. Bernard one too but you just have to stop somewhere. The beauty of these are, they will grace my Christmas tree during the holidays and then grace my dioramas and pictures for the rest of the year.

Happy Weekend!
It’s Two for Tea at ITFDS
I really should have released this blog post at around 3 or 4 PMish for tea time right? I have been saving these photos for a couple weeks to share here because I knew I would be tied up with dance recital photos this week and too busy to do anything in the doll studio. I had WAY too much fun with the conservatory diorama and decided to set up afternoon tea for a couple of Silkies. I hope you enjoy.
Models: City Smart ( yes {gasp!} she is deboxed) and Showgirl Silkstone Barbies
Gowns: Luncheon Ensemble Silkstone – City Smart and Bogue’s Vogues (http://www.etsy.com/shop/boguesvogues) – Showgirl
Diorama: Furniture is from MiniCHAIR(http://www.etsy.com/shop/miniCHAIR?ref=top_trail). Pastries and little macarons are by Mio Designs (http://www.etsy.com/shop/MIOdesigns). Both of the lovely hats brought to the tea were gifts from dear doll friends. Many “Thanks!” . Cake and tea set are Rement.


I feel the need for some macarons now ![]()
Getting Crafty at ITFDS
So what is Rebecca doing this week? She is having WAY too much fun with the glue, florist foam and needle and thread is what. I decided to do a little pictorial tutorial ( Hey!! it rhymes!) on the daffodils and tulips I did for the previous photo shoot.
I found the little clay pots at my favorite garden store but I think you can get them at Michaels or JoAnne’s as well. Tangential thought…are all craft stores someone’s name?…Michael, JoAnne, Ben Franklin…Anyone know? Anywhooo…onward… Take your pot, fill it with something to hold the flowers. I use florist wet oasis/ foam because it is easy to cut and it molds to any shape. I usually have it on hand to do floral arrangements but you can use whatever you have on hand. Many people use clay as well. I cover the foam with black paint and while the paint is still wet, I sprinkle coffee grounds on the foam allow it to adhere then shake off excess. Yes, this floral arrangement will smell like coffee for a while. You can use loose packed tea as well for a different look and smell. You may need to send the tea leaves through a sifter to get them to a small enough scale.


I cut pieces off of a random piece of greenery I had purchased at a craft store for the daffodils. For the tulips, I used leaves I had purchased at a craft store ( usually in the wedding section with boutonniere supplies). The pink paper tulips were sent to me by a friend from Holland ( love ya!) and the daffodils are another story. They are fabric flowers and not paper. I found them in a bundle at Ben Franklins(yet another craft store named after a person) about a year ago. Originally, the orange part was a full flower. I decided to sew the flower closed to get a trumpet and voila!…daffodil. I think it was just plain luck that it was in the right scale.

I am currently in LOVE with an Etsy shop called miniCHAIR ( http://www.etsy.com/shop/miniCHAIR?ref=top_trail). I purchased a shabby chic table with two chairs a week ago and loved it so much I had to get the hutch to go with it. The prices are reasonable ,in my opinion, for the 1/6 scale market. They ship super fast and pack things well.
I have also been busy with more paper minis. LOVE the Laduree boxes.

Platinum Violette
Okay…this one is for the Silkstone lovers. I could not let this diorama go without putting one of my favorite Silkstones within its shabby chic yumminess. Robert Best’s “Violette”, in my opinion, is one of the most feminine doll designs of his career at Mattel. She embodies gentility and spring to me. Perhaps it’s the lilac print on her gown, the large flowing design or the flowers in her hair…I don’t know…but put it all together and I feel the pull of springtime. It’s just so girly! She is also a platinum edition Silkstone which means she is not photographed often.
I have to give credit to my daughter Megan for this one. She took one look at the diorama I was working on and said “ Mom, you should put the doll in the purple gown in this one”. She was right!


What the set up looks like when I have to pull the big lights out. It’s a much more involved shoot…which is why you may see this diorama for a while. ![]()

The Birth and Upkeep of a Diorama…..
I love to build dioramas. I don’t seem to make much time to do it though. Most of my inspiration goes in fits and spurts. Once I start a project, I tend to finish it but it’s the getting it started that is my main hurdle. When Robert Best did “Shop girl” I knew I needed to do a shop for her. After thinking about it for a while and doing some research, I finally had an idea in my head and put a plan into action. When shop girl arrived, a new home was ready for her. Belles Choses, as it came to be known as, had it’s grand opening.
I was so happy with how it turned out that I decided to move it to a larger venue so the vintage fashion shop was packed up and “Belles Choses” moved in to the newer and bigger space.

When I originally did the back wall of the diorama, I used a beautiful soft blue paper and used spray adhesive to fix it to foam core to give it a nice smooth finish – like wallpaper. What I did not take into account was that this type of adhesive will lose it’s hold over time. So..fast forward a year later…and you have this

The heavy picture frame I was using for the inset display case was pulling the paper away from the backing and I was seeing these big voids…like the one above this frame. YIKES! I knew if I left it as is, the frame would eventually pull away and fall taking the paper with it…not good. So, I went about trying to come up with a fix.
First, the space had to be vacated……so sad and lonely in there.

The displaced horde….LOTS of little pieces in this diorama….good excuse to dust everything![]()

Let the repairs begin! I decided to swab behind the paper gaps with adhesive and see how it went. It’s not as smooth as the spray adhesive but…it may do. I shored up the heavy plaster frame with an equally heavy candlestick while it dried.

et voilà!


What did I learn? If you are using spray adhesive, you may also want to swab with some additional adhesive in key support points. I will be doing that from here on out. A big “Thank You” to all who commented on flickr and emotionally supported me through this weekend while I fixed it. It always helps if you know someone is pulling for you ![]()


Poppy Parker: Gallery Girl
I am in no way advocating the show “Gallery Girls” here. I saw a little bit of it and was…well…not impressed. The name rather comes from my idea when I redressed the newly released “The Happening” Poppy Parker in Mattel’s Tim Gun separates. I dressed her in the crisp white shirt and black skirt with glasses and thought she looked like some hip art gallery dealer. The diorama just kind of filled in after that. Hope you enjoy!
Model: “The Happening” Poppy Parker
Clothing, glasses and shoes: Barbie by Tim Gunn


The Wall Panel: The Painting Phase 2
The final touch added to the panel was the gilding. This was kind of hard for me because I wasn’t quite sure how much or how little to do. In the absence of knowledge I decided to do research and went through many of my travel picture that showed ornate gilded wall panels. Armed with that knowledge I went to town on the wall panel with a fantastic gold gilding pen from Krylon. And here is the finished product…..

Here are some of the products I used on the project

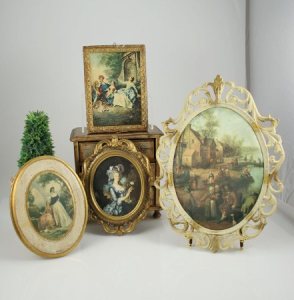
Here are some of the photos I used this wall panel in….


The Wall Panel: The Painting Phase 1

This phase believe it or not…took the longest in this whole process. When spray painting in 1:6 scale, there is one cardinal rule…..PATIENCE. Multiple thin coats gives the best results. I had a large computer box that I had saved to do spray painting projects in. I put a smaller box inside then laid the wall panel flat on that smaller box inside the bigger box. I have spray painted many, many small pieces of doll furniture but never a large wall panel. I was a little worried about my finger strength because I know even coverage relies on consistent and even spraying. I found something in my hardware store that made it soooo very easy to spray paint.

I am never going to do another spray paint project without this handy dandy plastic spray gun. They are fairly cheap too..double yeah! I used Dover white Krylon paint formulated for painting plastic. It took me a good part of one day to paint this panel. You have to spray one coat then wait about 15 – 20 minutes and do the next coat. I lost track of how many coats I did but there were more than 10. It is also important to note that if you are spray painting, you need the air temperature to be above 50 degrees and below 85 degrees for best results. One other thing I learned..the hard way…make sure you have a couple of cans of spray paint and that these cans were purchased at the same time. Much like fabric, spray paint has a certain die lot and if you buy paint at different times, it can have slightly different hues.
Stay tuned tomorrow for The Wall Panel: The Painting Phase 2……..
The Wall Panel: Construction Phase

I have a collection of what I call “gold embellishments”. Most are scrapbooking elements. I also use gold escutcheons ( keyhole cover) and other gold embellishments. On this wall panel, I used Jolee’s Boutique scrapbooking elements called Leaf Flourish 2 and two larger wood elements that I found at Michael’s. The wall panels and wainscoting panels are made out of Resin and are made by Lawbre. I don’t believe they make the large panels I used anymore but the wainscoting is still readily available. The crown molding I used at the top is Lawbre also. I ended up using another molding at top of crown molding called egg and dart and I used that on the base board at the bottom to give the piece continuity. The columns are flat resin pieces found at a miniature mail order shop. I also used two basic wood miniature shutters on the bottom of the columns to continue them to the floor. The baseboard for this panel are just two pieces of miniature baseboard glued one on top of the other. I covered all the seams between the components with miniature 1/4 inch chair railing and used the same chair railing to connect the flourishes on both large panels. I glued everything in stages and made sure things dried in between. The picture above shows what it looked like after gluing all the pieces. All of these components were glued on to a 22inch x 28inch trifold foam presentation board. The finished panel measures 15 1/2 inches X 18 1/2 inches.
Stay tuned tomorrow for The Wall Panel: The painting phase…..
The Wall Panel background
I have always been fascinated by old world architecture. My family and I travel and invariably, our travels will include visiting an old museum or estate so I can see the architecture. I have a particular fondness for ornate wall paneling. Don’t know why…just the way I am. I had always wanted to do some kind of ornate wall panel for my 1:6 scale photos and thought about it for a looooooong time. Whenever I would see something that might be interesting or work for my “wall panel” project I would buy it and put it in my project box. At the beginning of this year, Matt Sutton finished a commission OOAK doll for me and when I received this exquisite lady, I could see her in a setting with an ornate cream and gold wall panel in the background. I knew it was time to finally put my thoughts to action.

Explored on Flickr Jan 19, 2011
A number of people have emailed me asking for details on how I built the wall panel so I thought I would share that here.
The Wall Panel: Design phase


I gathered all the elements I had collected over the last two years to see what would work together and what would not. I ended up using miniature scale wall panels and a wainscotting panel to start then filled in with crown molding and column detail. I knew from the start that I wanted the wall panel to fit on a 22 inch X 28 inch trifold presentation board. I have used these boards in the past for backgrounds in my photos and the size works really well in my 30 inch photo tent. In the photos, you can see that I used a piece of furniture to try and get the right feel and scale for the panel.
Once I decided on the larger components, I played around with the smaller detail elements.

Stay tuned tomorrow for Wall Panel: The construction phase…….
Shopgirl’s fancy shop gets a name and some press
Ahh Photo shoot Friday yet again. Many, many different projects going on this week. First and foremost, Shopgirl’s fancy shop received a name and it’s Grand Opening photo shoot. I had to set it up on the table in the doll room so it had better light for the shoot ( thank goodness for the good weather this week!!) I had to fit in bits and pieces of time for the photo shoot throughout the day so I could get the best light – afternoon works the best with the maximum amount coming in through the doll room windows. Here is the setup
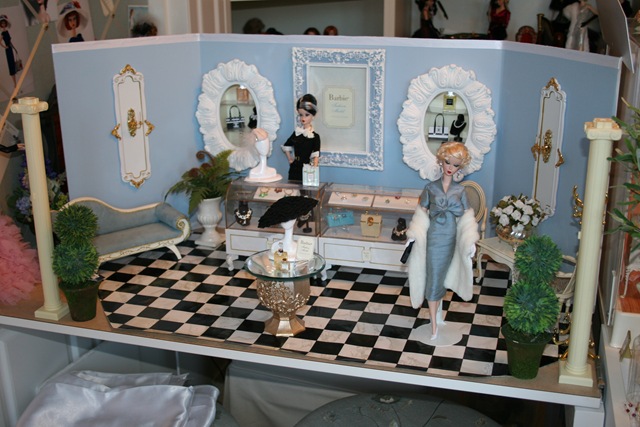
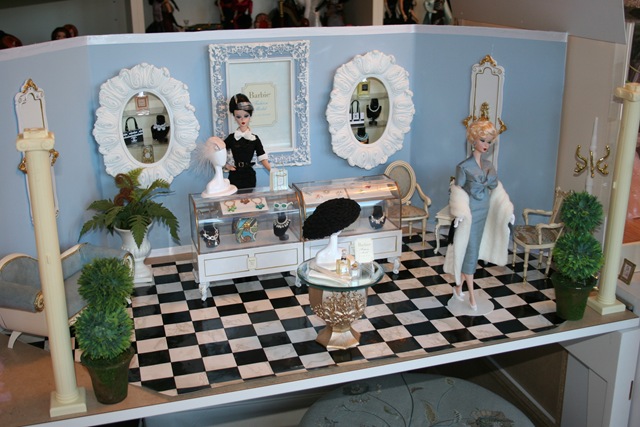
The photos turned out pretty good and I spent a huge chunk of time photoshopping and tweaking. Then a brainstorm hit and I decided to do another slideshow set to music just showing the shop and introducing the shops new name. Now there is a whole other story…..how did I decide on the shops name. I decided I couldn’t just keep calling it Shopgirl’s fancy shop. It needed its own name. It needed something classy to fit with Shopgirl. It needed something French as it felt like a European style shop. I bounced ideas of my trusted in-house technical support. He suggested I try translating directly “fancy shop”. Translated to French it read ” Boutique de fantaisie “. I looked at my technical support and he looked at me…..something was not quite right. “What?” he says, “Sound too much like an exotic dance place??”. Yep, it did. So off to find a better name. After much discussion we finally settled on “Belles Choses”. Translated, it means beautiful things. Yeah!! Shopgirl finally has a name for her beautiful shop. I finished up the slideshow and then began the arduous task of converting it to WMV (chug,chug,chug goes the computer) and posted it to youtube for everyone’s viewing pleasure. I think it turned out really cute. The snappy music is from the soundtrack “Miss Pettigrew lives for a Day”. A number of people have asked for more information on the lighting fixtures in the shop. Here are some more up close and “behind the scenes” photos of the shop.

The white panels with the gold embellishments are just mirrors from some Disney princess sets that I painted white (Krylon white spray paint for plastic ) and added gold scrapbooking photo corners to. The light fixture is a doll house candle sconce that I made look bigger by adding a gold escutcheon ( fancy word for keyhole cover). The light fixture could work if you wanted to drill a hole through the back of the plastic mirror. I was too lazy so that light fixture does not work. The built in display shelves have working lights however. They are just the clip on book lights that you find everywhere. Notice how I like to reuse silkstone boxes to LOL! I always love the “behind the scenes” photos from other people’s doll blogs so I hope someone else will find these of use. I also wanted to show the absolute carnage in the doll room after one of these shoots.
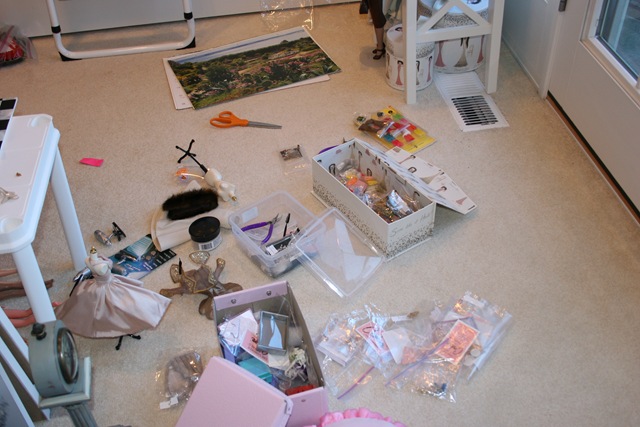
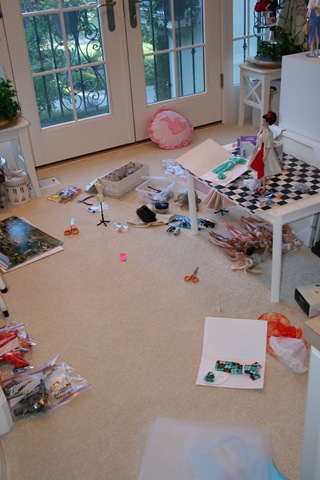
There is usually stuff everywhere because when the light is good, I’m just pulling stuff out and getting it set so I can get the shot. I worry about clean up much later. I was also able to do a phototent shoot that day and used a seldom used model in the silkie world…Chataine. I recently aquired some outfits from Fashion Boulevard. I LOVE them. Here are a few shots from that set

. Well that about does it for now.
Photoshoot Friday – Shopping for Props