A Lazy Afternoon and A Camera

I love my studio. Most days, I have more ideas than I know what to do with. Some days,however, are for photos outside of the studio. Some days are just made for grabbing the camera, no tripod, no light boxes, just beautiful natural sunshine and something fun to photograph. That is what this Saturday was for me. I just finished a new diorama in the doll room and I needed some unstructured camera playtime before I brought the serious lights in to set up a shoot for the diorama. I am a big advocate of the philosophy that you don’t need the best camera or the expensive professional lighting to take a really good photo. I also have to admit that you don’t NEED a really good camera but…I can’t lie…it does help. Case in point: Here is a photo with my point and shoot Canon PowerShot SX130IS.

It is a fine picture. On macro mode it is a fairly crisp shot for a hand held “no tripod” photo. The direct sunlight coming into the room made that possible. Now…here is what I can get with my Canon 40D DSLR and an f/2.8 macro lens.

Same light, no tripod. This is the difference between a point and shoot and a DSLR. You will just get more.

It is also important to note that while a good camera gives you more, the most expensive camera does not necessarily give you the most. My lovely husband surprised me this Mother’s Day with my dream camera. I had that baby unpacked and in my camera bag ready for the next days photo shoot as fast as my little fingers could manage it. While it is amazing and works like a dream in low light performance and theater shooting, it is not the best to use for doll photography. I still prefer my tried and true Canon 40D for my doll photography and I really don’t see that changing any time soon.


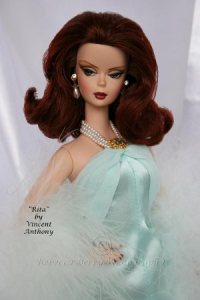
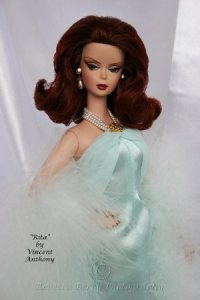
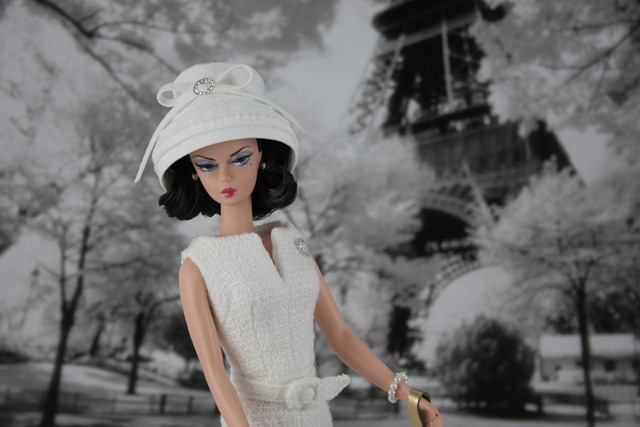
Silkstone and Fashion Royalty Repaints both done by Jon Copeland. Silkstone is wearing A little Moonlight by Randall Craig. Repainted FR Anja is wearing “Serenade in Satin” by Mattel. The hat was made by me.
It’s Complementary My Dear Watson
As I have stated before, I love to photograph a red headed doll in a green dress. I am partial to the redheads in my collection so I enjoy photographing them. Why then do I always seem to gravitate towards dressing them in green? Yes, I like green but there are other reasons at play here.
Most of us learn in grade school art class that there are three primary colors red, blue and yellow. All other colors come from these three primary bases. We also learn that there are complementary colors. These are colors that are directly across from each other on the color wheel

In art and graphic design there are many theories about these colors and usage. In photography, it is generally accepted that the use of complementary colors helps intensify colors or makes them more active in your photo. I am simplifying it I know and if you really want to do the research, there are ample reams of info on the internet. My point is, using these complementary colors can help give that extra pop in some of your photos.
Red/Green


Blue/Orange(yellow)


Seasons Greetings from ITFDS
After a couple of weeks of absolute holiday craziness…I am sure you all can relate….I have finally finished editing photos of the doll room and surround for your viewing pleasure. Because I have some avid pinners out there who are still pinning from my skydrive when I have asked “Please, please , please don’t do that ( you know who you are), I will not be posting all the photos in a slideshow. I have , however, put together a slideshow set to music which I have uploaded to youtube and am sharing here too. I will share a few stills but the bulk of the photos are in the slideshow. There are over 100 photos in the slideshow so a little something for everybody ![]()
Happy Holidays! From my doll room to your home, I hope you enjoy the photos and slideshow. I also want to take this opportunity to say a huge, huge “Thank You” to my readers and commenters. You are..in a phrase…”why I do what I do”. I thank you all for your support and encouragement. I hope in 2013 that my work will continue to interest you.


Note**** If you want to see the high resolution version of this, you need to tell the youtube player on your scrren to give you the highest quality. It’s one of the small icons on the bottom right of the youtube screen**
Flickr 2012
Sorry for the long delay between posts guys. Things have been super busy with photo-shoots lately so…sadly….no doll time. Finished my last job for the holidays this past week ( or least the photo shoot part) so I can put some more time into the blog…yippeee!!
Since I don’t have any new photos to share today..but soon…I promise, I will bring up some favorites from the year. If you are a Flickr member and contributor, you have most likely seen many of these already. At the end of the year, many of the fabulous collectors and photographers on Flickr post their most viewed, most favorited, most commented on and personal favorite photos for the year. I decided to participate this year and wanted to share it here as well. It was a hard choice to come up with a personal favorite so I am going to also share the runners-up for my personal favorite photo. If you had a favorite this year, feel free to comment. I would love to hear what people are responding to and what they would like to see more of.

And now for the runners up for my personal favorite photo…..
1st Runner Up

2nd Runner Up

3rd Runner Up

A Dior Holiday Treat For Every Doll Collector
I was perusing new additions from my favorite Flickr photostreams recently and a series of photos completely caught my eye. NylonBleu has long been a favorite of mine on Flickr. Her photos are romantic homages to the art form of doll photography. Her photos for me always evoke grace, style and a true love for fashion and fashion doll collecting…it shows in each and every photo she posts. Last week, she shared photos on her Flickr of the unveiling of Printemps’ holiday windows in Paris. Dior designed the windows this year and the only words that come close to describing my reaction is awe inspiring. I don’t know the scale of these dolls…but the pure inspirational artistry and design of these windows has me frantically searching for a 1/6 carousel horse for a future photo shoot .
Oh…and Integrity Santa…Please oh please let me find one of these in 1/6 scale in my Christmas stocking. I promise to be a very, very good girl.
**Photo credit Dior Resort 2013 Style.com**
** ** All images are owned by NylonBleu, and are protected by U.S. and international copyright laws. Do NOT copy or reproduce in any way shape or form. Photos are being displayed on Inside The Fashion Doll Studio with permission from NylonBleu**


How absolutely magical are these?!! It’s like a dream you don’t want to wake up from. Oh to be standing in front of these windows and drinking in these images. The thought just makes me smile as I sit here sipping coffee on a Saturday morning. To see more fabulous photos of these windows and NylonBleu’s beautiful work visit her Flickr photostream at http://www.flickr.com/photos/38766564@N04/page1/. If you need a few more holiday dream moments, watch the video that NylonBleu pointed us to on her Flickr. It is about the making of these glorious windows and it is 100% pure unadulterated eye candy. LOVE IT! Thank you, Thank you Isabelle for sharing the photos of these magical windows and the youtube link for a glimpse into the inspiration behind these holiday fantasies.
The Lady in Red: Part Four
This is the final part of this series and technically…she isn’t wearing red but in front of it. Red, however, is a big part of the shot. This “ Lady in Red” series had showcased the Fashion Royalty girls in my collection and it was time to pull out the beloved Silkstones. I love these shots for a few reasons.
1) It showcases one of my favorites Silkstones..a repaint by Jon Copeland of SeloJSpa(http://www.facebook.com/SelojSpa)


2) It has a high drama content…LOVE.

I love the lighting in this shot. It gives it that feeling of her actually being up on the stage with that little spotlight on her face.

3) It shows off a glitzy showgirl ensemble(Jazz Diva by Mattel) and the styling was inspired by a great conversation with fantastic doll friend. Matty of http://www.fashiondollfoto.com/ and I don’t get the chance to talk that often but when we do…good doll photos or doll blog ideas follow. Matty, this one’s for you {HUGS!}.


and 4) The background was flash of inspiration and something that caused me to say to myself “ Oh I need to talk about this on the blog”. After Matty gave me the idea that I should dress this doll in this outfit, I immediately saw a red show curtain. I saw “full on diva” and she needed a crushed red velvet curtain falling in folds behind her. One of my problems ( and yes, there are many of those LOL!) is once I have this image in my head..there is no talking me out of it. I knew I didn’t have crushed red velvet fabric for a backdrop. I also habitually run into the problem of having something in my head and then not being able to find it ANYWHERE. I knew I didn’t want to have to spend time or money searching for red crushed velvet at my local fabric stores. That’s when I took a step back and said “Okay Bec..what do you have that would work?” and inspiration struck.
“Ways in which you never thought you would use your kids old Halloween costumes.”

Yes! That was my daughters Halloween costume from a couple years ago sitting in a box in the kids playroom. It was the right color, texture and bonus…it had some black lace detail accents…more DRAMA! Perfect background curtain material. So if you are having trouble finding a background for you photos, don’t forget to check out the kids dress up box.![]()
Poppy Photo Shoot 2011/2012 Resort Wear 4
Are you sick of Poppy yet? Well I’m not so here is more Poppy spam. Today Poppy is showing us a more muted and refined South Beach look. Robert Best designed a number of dolls from 2006-2007 called “On Location” Barbies. The swimsuit in these shots is from “On Location South Beach” Barbie. All the dolls in that series were fabulous and I still have them. They came with a swimsuit, sophisticated evening outfit and a more casual day wear look. What more could you have asked for in a set? Sadly, he only did four and that was it. The set was worth it for the clothing alone but the dolls themselves are gorgeous as well. Here is the link to their photos at the Barbie Collector website:
http://www.barbiecollector.com/showcase/category/fashions#BestModels
Model: Sweet Confection Poppy Parker
Swimsuit: On Location South Beach Barbie
Shoes: Barbie
Earings: BFMC Debut Silkstone Barbie
Bracelet: Barbie Basics Collection 03 – Look 01
http://www.barbiecollector.com/shop/doll/look-no-01-collection-003-w3338
set: Please refer to Poppy photo shoot day 1


I am really appreciating these sunny shots today. We have about 6 inches of snow on the ground with more on the way tonight. This is unusual for the Pacific Northwest in the United States. We don’t typically get this much snow so close to the ocean. I’m glad that Poppy is enjoying her time in the sun. ![]()
Envied in the Sunlight
Many people ask me about my photography and how I light my shots. Many of my photos are taken in a photo tent with diffused lighting from the sides and a soft box light from the front. Sometimes I will use an overhead ( highlight or hairlight) lamp. I find that I use this setup many times because the light where I live is…well..crap. I live in the Pacific Northwest of the United States where we get rain 7 out of 12 months a year. Don’t get me wrong, I love living here. When it comes to photography , however, it can be a challenge. Yesterday, I was so very excited. We had one of those beautiful Indian Summer glory days…bright blue sky and abundant sunshine. I was redressing Ms. Envied after doing some redress shots, The sunshine was coming in the window at a perfect angle to project a grid pattern on the carpet so I just posed Ms. Envied on her stand, laid down on the floor and started snapping. You can make a tripod out of your arms by bracing both elbows on the floor or any stable surface. Just goes to show yet again….you don’t need a fancy light tent to take good doll photos. I love this shot. Sooooooo dramatic.
Oh, and yes, we are back to gloomy and overcast today. ;-(

Behind the Scenes on the Agnes Photo Shoot
I always love it when fellow collectors and photographers share some of their behind the scenes photos. I always find it extremely helpful to see what other people do as far as styling and photographing their collection. I thought I would do the same and share what my set up looks like when I do a fashion doll shoot. Keep in mind that I live in the Pacific Northwest which means there is little to no light from November through July ![]() . That may help explain what most would consider ‘overkill’ when it comes to lighting.
. That may help explain what most would consider ‘overkill’ when it comes to lighting.


The Wall Panel: The Painting Phase 2
The final touch added to the panel was the gilding. This was kind of hard for me because I wasn’t quite sure how much or how little to do. In the absence of knowledge I decided to do research and went through many of my travel picture that showed ornate gilded wall panels. Armed with that knowledge I went to town on the wall panel with a fantastic gold gilding pen from Krylon. And here is the finished product…..

Here are some of the products I used on the project

Here are some of the photos I used this wall panel in….


Doll photography does not have to be complicated
I get many questions about my doll photography. My husband and I share photography as a hobby and we enjoy learning about this fascinating subject together. I know many collectors would love to take more and better photos of their collection but become discouraged when they think they need to have the right camera or special lights, light tent, lenses….ect. While I use a number of these things in my little fashion doll studio, it is important to note that you don’t really NEED these to take a great photo. Well…you DO need a camera but it doesn’t have to be fancy. Some of my most popular and personal favorite shots were taken without my light tent in a soft diffused light that we seem to have an abundance of in the rainy Pacific Northwest of the US. Here is an example of what I mean.

This was taken when I was breaking down the set from the Randall Craig photo shoot and I needed to set Miss Showgirl up in the window sill to get her out of the way. It was a cloudy day ( no surprise.. there has been no sun here for over a week!…grumble, grumble..vitamin D deficiency rearing its ugly head) and there was lovely diffused afternoon sunlight coming in the window. I loved how it looked with the white millwork and her pink dress so I forgot about breaking the set down for moment and grabbed my camera on tripod. I have used this same window for another favorite photo….

I just love these soft and dreamy shots. So…next time you have a cloudy day, grab your favorite doll and camera and find a good windowsill. ![]()
Behind the scenes in Rebecca’s studio
I have had a number of board members write and ask me to share how I take my photos. With their encouragement, I thought I would share some information on my thread. I know I always love to see the “behind the scenes” shots on other peoples dioramas and photos so I hope you will find it useful.
I take most of my photos in a photo tent:

It is basically a nylon cube ( that can be folded up and stored away but I leave mine up as I use it all the time). I use a variety of backdrops – most that are made specifically for the 30 inch photo cube that I use.
Lighting is a key feature in what I do. I use three separate lights that difuse through the nylon photo tent.

The fact that there is defused light really cuts down on shadows. Some people use one big soft box light from the front ( I think this is how Mattel does theirs) but I prefer the flexibility of different light points.
The studio does take up space….

But, for me….I use it almost every day. It is set up in the corner of our bonus/play room so I enjoy being up there when my daughter is practicing her violin or when my son is playing a video game. I have the tent set on two shelves so I can store props that I use for photos.


The other big component of my photography is the processing afterwords or post production. For me, that is photoshop Elements. I try to get most of the componets I want when I actually take the picture but I normally tweek every single photo with photoshop before I post it..even if it is just to resize it to the appropriate dimensions for the various doll boards. I like to whiten backgrounds with photoshop and saturate colors if necessary. Here is a raw photo:

And here is the finished product after photoshop.

Here is an example of what a set up looks like when everything is lit up

I hope you found this information helpful. Feel free to ask questions.
–Rebecca
Using Calendars as backdrops
I am always on the hunt for things that will work as easy and interesting backdrops for my photos. Lately, in Costco, I have seen some large 14×10 calendars that have been fun to use and I thought I would share some of the results here.
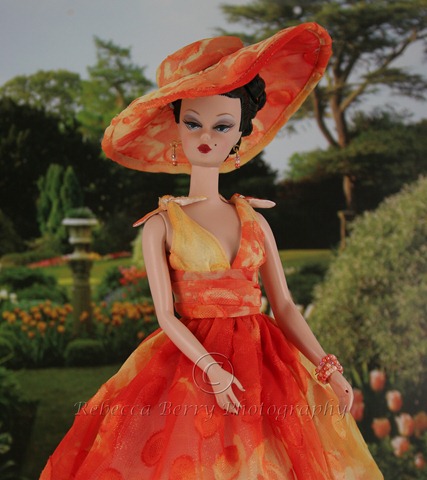
My first attempts at using the backdrops were using a black and white calendar with pictures of Paris ( one of my all time favorite places on the planet to visit). Here are a few photos from those efforts.


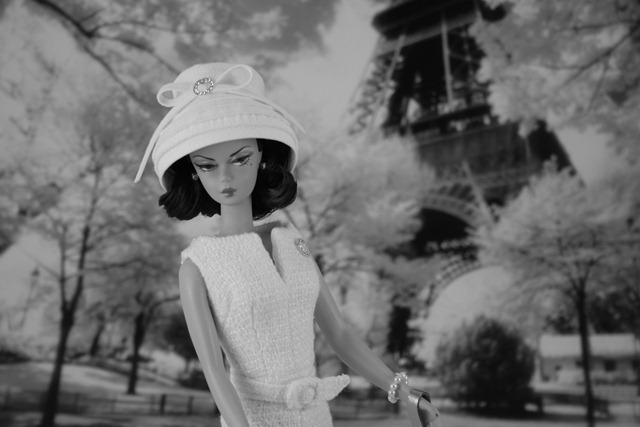
Originally the photos were like this with the dolls in color and the background in black and white.
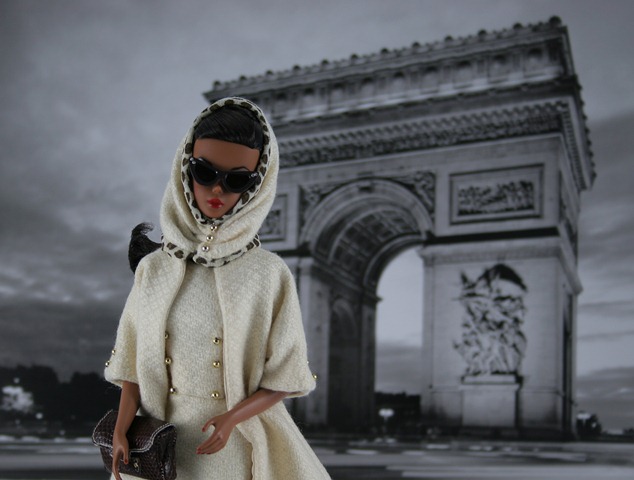
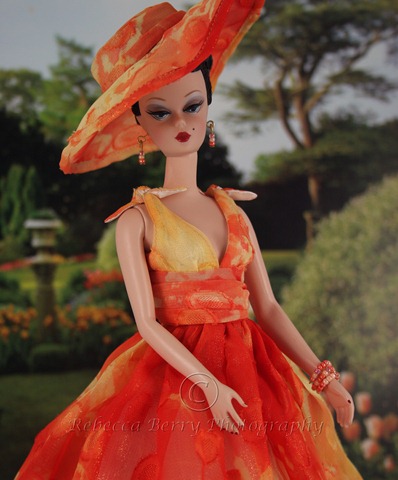
This is very easy to change in photoshop. Just select Black and White in your color adjusting window and presto chango. I may have had to tweek the contrast and brightness on these as well but that is also easily done in photo shop. These ladies are only shown from the waist up as the calendar page backdrop stopped right at waist level. I think they turned out pretty cool so I attempted to try it with color.

I think the most important thing to remember with these photo backgrounds is scale and lighting. I hung the calendar pages with tape on a piece of cardboard at the back of my photo tent. I look through the lens of my camera ( on a tripod) then eyeball whether or not the photo is high enough and the doll placed an appropriate distance from the photo to give it the right scale. This is very low tech and fairly easy to do. Just play with the lighting until it looks right to you and make sure you crop the photo to remove any evidence that it is really a picture in the background. I realize that all this is so much easier to do in photoshop. I am having a great deal of fun learning the fun things you can do with that program. It is, in my opinion, however, a very difficult program to learn and somewhat overwhelming. If anyone wants to add some splash to their backgrounds….this is one way to do it. Just wanted to share.
–Rebecca
Dahlia visits the museum
I was able to fit a photo shoot in this weekend as I slalomed through costume fittings, rehearsals, ballet classes and social engagements for my daughter. I am just her chauffeur LOL! I have had this idea for a while of setting up a museum scene and I finally had the prefect Bogue’s Vogue that could be showcased in this setting. Here is a shot of the full set
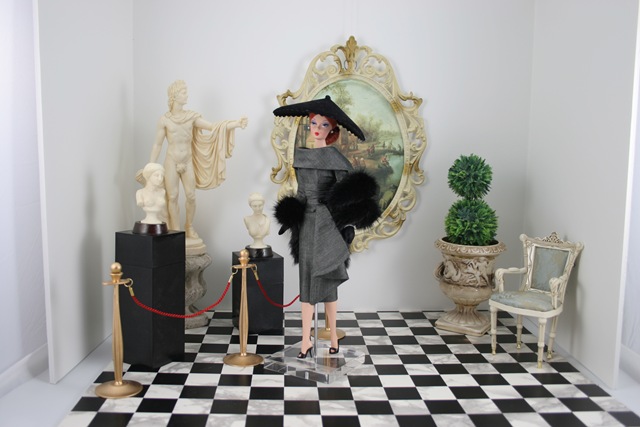
The resulting photos turned out very good, I think. They all had the feel I was going for.

I was just about to put the camera away when the sun streamed into the area that I have my photo studio so I moved Dahlia to a smaller table just inside the pool of light and took a few shots. This was just freehand without a tripod….always risky…but I managed to get some pretty clear shots. Here is the one I think is the best of the bunch. Very film noir.
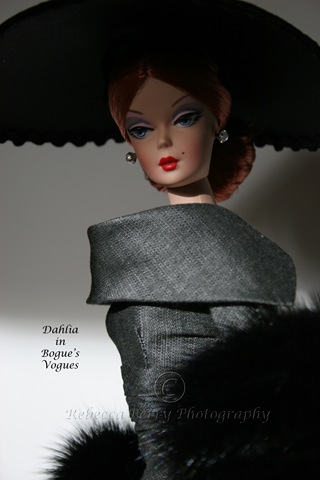
Photo effects to start
I was just kind of playing around today with photo effects. There are a number of internet sites that are free and have some really cool effects you can add to your photos. Today I used a website called Photofunia and BigHugeLabs ( websites posted below). These sites are very easy to use. There are some tricks however. Make sure you have your photos sized correctly. If you have photoshop, this is really easy in that you just open a file and select Image, then resize. Photofunia for example has a 3200 pixel max so the largest side cannot exceed 3200 pixels. When you resize, make sure the largest side is not bigger than 3200 pixels. With Photofunia also remember that portrait, face or face and torso only make the best shots for this software. Here are some of the fun photos I ended up with.


Pretty cool huh? Just remember that you will most likely need to resize your photos to use this software. After you have created the image on these free websites, you will be asked if you want to send it to a friend or save it to disk or file. I usually save it to file then copy it onto my photo sharing service. Hope this helps give people ideas on some additional things they can be doing with their photos.
Photofunia – http://www.photofunia.com/
BigHugeLabs – http://bighugelabs.com/
And there are more…just search under “photo effects” and look for free sites.
Photoshoot Friday – Rita Hayworth came to visit